headingElement
A section heading.
With headings, you can structure your document into sections. Each heading
has a level, which starts at one and is unbounded upwards. This level
indicates the logical role of the following content (section, subsection,
etc.) A top-level heading indicates a top-level section of the document (not
the document's title). To insert a title, use the title element
instead.
Typst can automatically number your headings for you. To enable numbering, specify how you want your headings to be numbered with a numbering pattern or function.
Independently of the numbering, Typst can also automatically generate an
outline of all headings for you. To exclude one or more headings from this
outline, you can set the outlined parameter to false.
When writing a show rule that accesses the
body field to create a completely custom look for
headings, make sure to wrap the content in a block (which is
implicitly sticky for headings through a built-in show-set
rule). This prevents headings from becoming "orphans", i.e. remaining
at the end of the page with the following content being on the next page.
Example
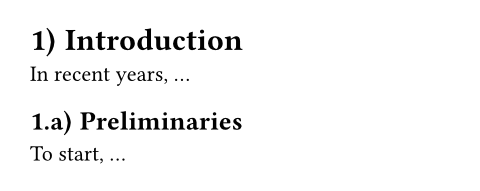
#set heading(numbering: "1.a)")

= Introduction
In recent years, ...

== Preliminaries
To start, ...
Syntax
Headings have dedicated syntax: They can be created by starting a line with
one or multiple equals signs, followed by a space. The number of equals
signs determines the heading's logical nesting depth. The offset field
can be set to configure the starting depth.
Accessibility
Headings are important for accessibility, as they help users of Assistive Technologies (AT) like screen readers to navigate within your document. Screen reader users will be able to skip from heading to heading, or get an overview of all headings in the document.
To make your headings accessible, you should not skip heading levels. This means that you should start with a first-level heading. Also, when the previous heading was of level 3, the next heading should be of level 3 (staying at the same depth), level 4 (going exactly one level deeper), or level 1 or 2 (new hierarchically higher headings).
HTML export
As mentioned above, a top-level heading indicates a top-level section of
the document rather than its title. This is in contrast to the HTML <h1>
element of which there should be only one per document.
For this reason, in HTML export, a title element will turn into an
<h1> and headings turn into <h2> and lower (a level 1 heading thus turns
into <h2>, a level 2 heading into <h3>, etc).
Parameters
level
The absolute nesting depth of the heading, starting from one. If set
to auto, it is computed from offset + depth.
This is primarily useful for usage in show rules
(either with where selectors or by accessing the
level directly on a shown heading).
 View example
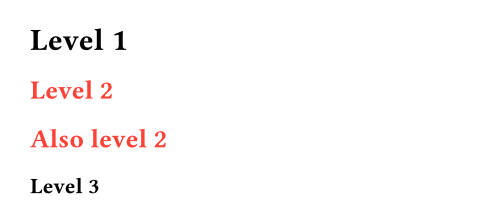
#show heading.where(level: 2): set text(red)

= Level 1
== Level 2

#set heading(offset: 1)
= Also level 2
== Level 3
Default: auto
depth
The relative nesting depth of the heading, starting from one. This is
combined with offset to compute the actual level.
This is set by the heading syntax, such that == Heading creates a
heading with logical depth of 2, but actual level offset + 2. If you
construct a heading manually, you should typically prefer this over
setting the absolute level.
Default: 1
offset
The starting offset of each heading's level, used to turn its
relative depth into its absolute level.
View example
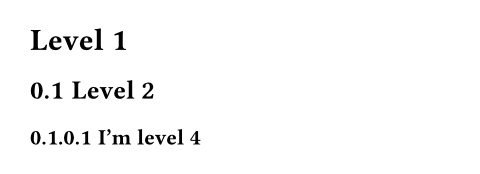
= Level 1

#set heading(offset: 1, numbering: "1.1")
= Level 2

#heading(offset: 2, depth: 2)[
  I'm level 4
]
Default: 0
numbering
How to number the heading. Accepts a numbering pattern or function taking multiple numbers.
View example
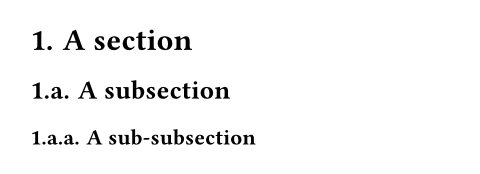
#set heading(numbering: "1.a.")

= A section
== A subsection
=== A sub-subsection
Default: none
supplement
A supplement for the heading.
For references to headings, this is added before the referenced number.
If a function is specified, it is passed the referenced heading and should return content.
View example
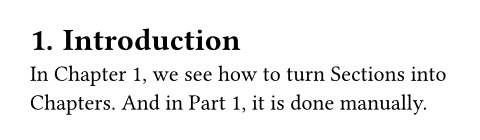
#set heading(numbering: "1.", supplement: [Chapter])

= Introduction <intro>
In @intro, we see how to turn
Sections into Chapters. And
in @intro[Part], it is done
manually.
Default: auto
outlined
Whether the heading should appear in the outline.
Note that this property, if set to true, ensures the heading is also
shown as a bookmark in the exported PDF's outline (when exporting to
PDF). To change that behavior, use the bookmarked property.
View example
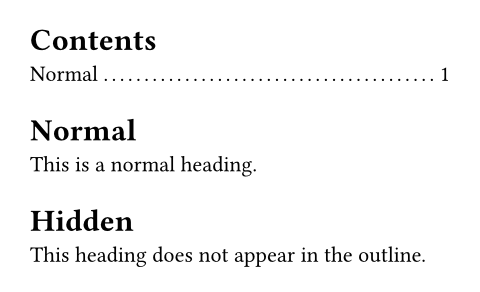
#outline()

#heading[Normal]
This is a normal heading.

#heading(outlined: false)[Hidden]
This heading does not appear
in the outline.
Default: true
bookmarked
Whether the heading should appear as a bookmark in the exported PDF's outline. Doesn't affect other export formats, such as PNG.
The default value of auto indicates that the heading will only
appear in the exported PDF's outline if its outlined property is set
to true, that is, if it would also be listed in Typst's outline.
Setting this property to either true (bookmark) or false (don't
bookmark) bypasses that behavior.
View example
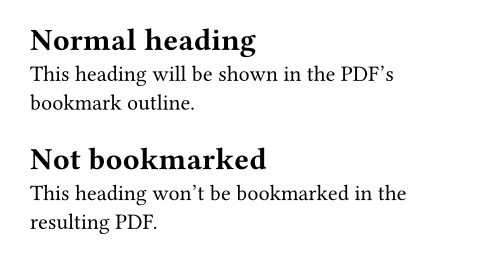
#heading[Normal heading]
This heading will be shown in
the PDF's bookmark outline.

#heading(bookmarked: false)[Not bookmarked]
This heading won't be
bookmarked in the resulting
PDF.
Default: auto
hanging-indent
The indent all but the first line of a heading should have.
The default value of auto uses the width of the numbering as indent
if the heading is aligned at the start of the text
direction, and no indent for center and other alignments.
View example
#set heading(numbering: "1.")
= A very, very, very, very, very, very long heading

#show heading: set align(center)
== A very long heading\ with center alignment

Default: auto
body
The heading's title.